Insights

How to use Microsoft Teams Live Events

Microsoft Teams Live Events, part of Microsoft Teams allows you to broadcast online events to audiences of all sizes, both publicly and internally.

Note: Microsoft will be retiring Teams Live Events on 30th September 2024. Live Events will be replaced with Teams Town Hall, which gives a similar experience.

In this article, we discuss exactly what Teams Live Events are and give you step-by-step instructions that will get you running your own live events in no time.

What are Teams Live Events?

At its simplest, Teams Live Events enables you to stream live video and digital content to audiences of up to 10,000 attendees.

Teams Live Events is designed for situations where the few are presenting to the many — contrasting with standard Teams Meetings which are designed for interactive and collaborative participation from many members of the meeting.

Ideal use cases for Teams Live Events include webinars, product demos, corporate presentations and conferences.

Additional features which add to the user experience include:

  • Live Q&A
  • Post-event video downloads
  • Attendee engagement report
  • Live captions and translation
  • Transcripts

It should be noted that Microsoft have announced that Teams is also getting a webinar registration and reporting feature — allowing organisers to benefit from automated registration emails to help manage attendance. Keep an eye out for future updates on this from Microsoft.

With Teams Live Events, you can assign members of your event team as producers or presenters. With each member of the team using a different device, you can coordinate seamless and engaging online events from anywhere in the world at any time — regardless of where your presenters are based.

Do I need a Teams Live Event Licence?

You don’t need a specific licence, however you will need one of the Office 365 E1, E3, E5, A3 or A5 licences which include Microsoft Teams. The person creating the event must be a member of the organisation and can’t be a guest or from another organisation. They will also need to have an Exchange Online mailbox.

You may need to ask your IT administrator to use the Microsoft Teams Admin Centre to grant you permissions to create live events in Microsoft Teams and enable any associated permissions.

Teams Live Events vs Skype Meeting Broadcast

Teams Live Events is the new and improved version of Skype Meeting Broadcast, however there are a number of differences – which we’ll only briefly touch on here as Teams will be replacing Skype for Business on 31st July 2021.

For example, in Teams Live Events you can screenshare, which wasn’t possible with Skype Meeting Broadcast and Live Events also supports dial-in presenters.

Teams also supports external encoders and hardware for those who want to produce their events with external production tools and media mixers etc.

Event Team Roles and Responsibilities

Before we guide you through setting up you Live Event, you need to understand the four key roles involved in running a Teams Live Event properly:

  • Organiser
  • Producer
  • Presenter(s)
  • Attendees

Organiser in Teams Live Events

The organiser is the person responsible for selecting the event team members and their responsibilities, scheduling the live event, configuring the event permissions and settings and distributing invitations to potential attendees.

The organiser should also take responsibility for the event setup and any testing required before the event.

For example, you might simply decide to use your laptop’s integrated webcam for your video and produce your live event straight in Teams. Even if you do this, you should think of testing variables such as the acoustics in the room, lighting and your connection.

Microsoft have a great Teams Live Event Organiser Checklist here that’s worth reading.

Producers in Teams Live Events

There is only one producer. The producer sends the event live and also finishes the event.

The producer controls the live event, taking responsibility for ensuring the correct content and format is being presented at the right times to the audience. The producer can share their own audio, video or screen share, as well as video and content from the presenters. If the producer is not taking part then it’s good practice for them to mute their microphone.

Presenters in Teams Live Events

You can have multiple presenters on your live events. Each presenter can present their audio, content (screen sharing), or live video (webcam or camera) during the event – but only if the event is being produced in Teams (as opposed to an external platform). If all presenters have their audio on then attendee’s are able to hear everyone – allowing presenters to talk to one another. However, if you wish for just one presenter to speak then you should ask the others (including producer) to mute themselves. The producer is able to mute all presenters but only individuals can unmute themselves.

Presenters can also act as moderators if you have switched on the live Q&A session option.

Attendees

Your Teams Live Event attendees can be external or internal attendees – depending on whether you make your event public or private. Attendees can join the event via their invitation link and can either view the event in their web browser or Teams app if they have it.

Public attendees can choose to either view the event as ‘anonymous’ or they can log in with their Microsoft account. If they do choose to join anonymously, they can still set a name for themselves if they wish to — which can optionally be displayed when asking questions during a live Q&A session.

How to schedule a Teams Live Event

To schedule a Live event, simply go to your calendar in Microsoft Teams. In the top right corner of the screen, click on the drop-down arrow and select ‘Live event’.

You’ll now be presented with the live event set-up screen. Here you can add the following details:

  • Title: Give the live event a name
  • Location: Add a physical location to the event, such as the conference room from which you’ll be presenting – if you wish
  • Start and end: Set the date and time of the event
  • Details: Provide details of the event for attendees
  • Organiser: you can choose if you’ll be the producer or presenter
  • Presenters: Add any other colleagues who will be presenting by typing their name or email address

Click next.

You’ll now be given the choice of attendee access permissions for your Teams live event.

  • People and groups: If you select this, you will see a box where you can add a person by name or email address – or you can add an Office 365 group (e.g. your Finance Team)
  • Org-wide: This will enable anyone within your organisation to join the event simply by signing in
  • Public: This means anyone can join the live event – as long as they have a link to the event

N.B. if the ‘Public’ option is greyed out, this is because it is switched off by default. You will need to contact your IT administrator and request that the public option is enabled.

Below this, you will see further options to choose from.

The options are split into ‘Teams’ and ‘External app or device’.

We’ll be focusing on the Teams option, as the external device option is for situations where you might be recording and presenting from something like a professional film set-up with an external encoder – which is beyond the scope of most employees’ needs.

  • Recording available to producers and presenters: this is greyed out as this is automatically enabled
  • Recording available to attendees: this means a recording of the event will be created for anyone that missed the event or for those who want to watch the event again later
  • Captions: this is greyed out as we haven’t enabled this option, but if you choose to enable it you will be able to see text captions created based on the audio – and you’ll have the option to translate this to up to six languages
  • Attendee engagement report: this report gives you the option of accessing an engagement report which gives you information on the attendees
  • Q&A: this is toggled off, but you can toggle it on if you want event attendees to be able to ask questions to the presenters to inform a Q&A session during the live event

Once you’ve selected the options you want, click the ‘schedule’ button and you’ll see the following screen.

The ‘Get attendee link’ button will copy a URL link to your clipboard, which you can then paste into anything from an email to a WhatsApp message – enabling you to share your link with potential attendees.

Following the event, attendees will be able to watch the event again with the same link — but only if you ticked the ‘Recording available to attendees’ option during the event set up.

Starting your Teams Live Event

If you have added presenters to your live event, they will receive an email invitation as in the example below. They just have to accept the invitation and add it to their calendar.

Anyone acting as a Presenter, must use the Teams desktop app. It doesn’t matter if it’s Windows or Mac, but you can’t present using the web app or mobile app.

If you decide to remove them as a presenter, simply go into your calendar, click on your live event and then ‘edit’. You can remove the presenter and click ‘update’ which will send them an email saying the event has been cancelled with the option to remove it from their calendar.

As the producer, you can now get the event started. Simply go into your calendar and click on the live event. This screen will appear and you’ll be able to click the join button to join the event.

N.B. the event won’t be live straight away, this will just take you to the producer’s user interface where you can get your content ready before going live.

As you can see below, the producer’s screen is split into two separate windows with ‘Queue’ and ‘Live Event’.

You will also notice a yellow button stating ‘pre-live’ towards the top of the screen, which means the event isn’t live yet.

At this point, if any of your attendees were to join the event via the link, they would see the following screen.

Adding content to the queue in Teams Live Events

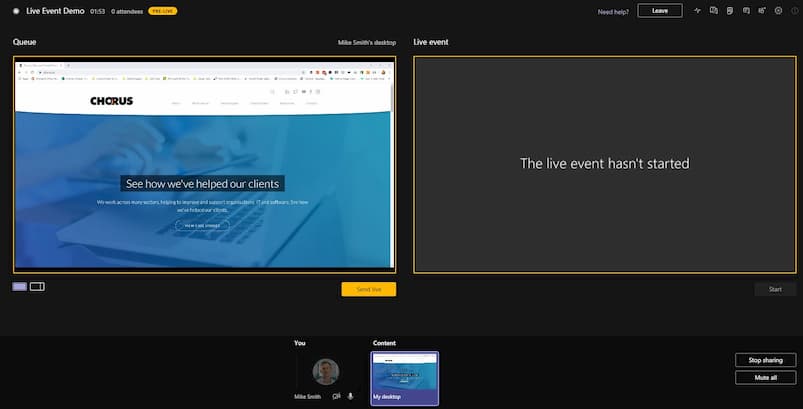
On the producer’s screen, you can add content to the Queue. If a presenter has shared some content, you will see a small thumbnail image of their content at the bottom of the screen – which you can select.

If you are both the producer and the presenter, click the ‘share’ button and you will see all of the different windows you have open on your device. You can select any of these to share.

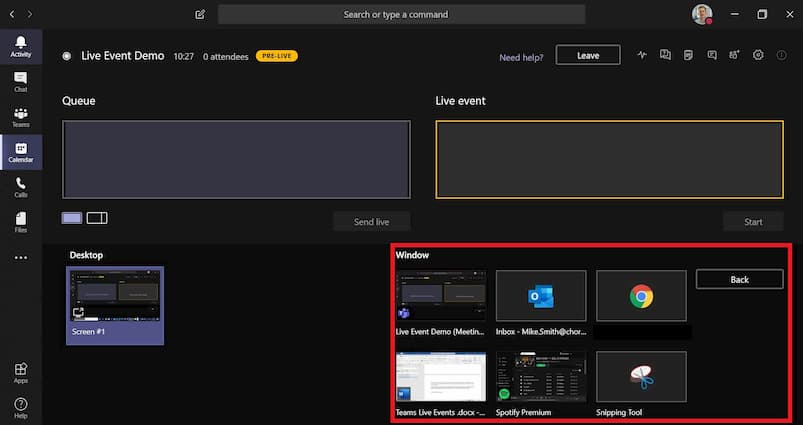
Select one and it will send it to the queue window.

If you’re on a laptop with a smaller screen, the window may crop some of the content so it appears as if some of the content is missing. Don’t worry about this — the content will display fully for attendees.

If you want to share video of you or a presenter next to the content, you can use the small button below the queue window to toggle between views (known as ‘single source’ or ‘content left’).

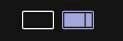
The ‘Content left’ layout appears like this, with the content on the left and a space for video on the right side of the window.

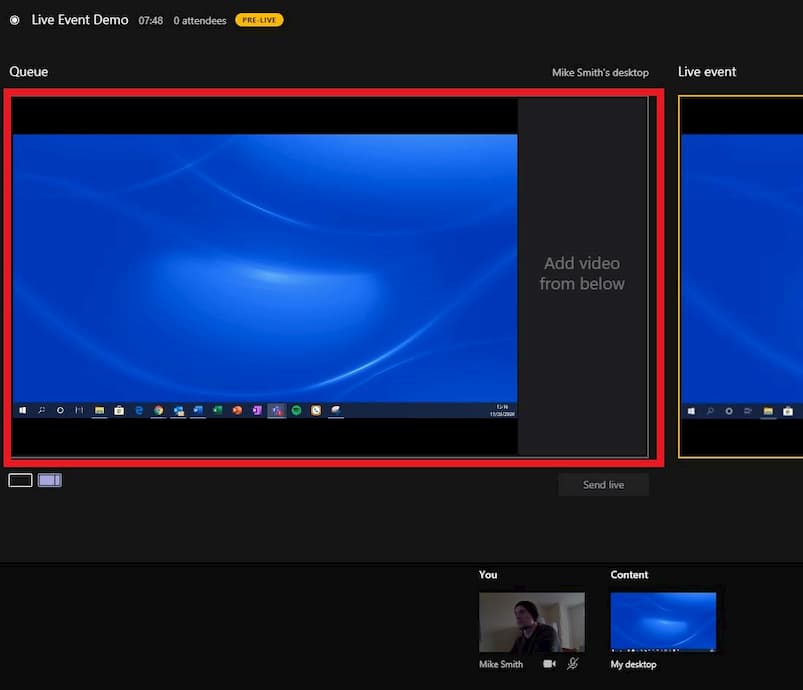
To add video, click ‘add video from below’ and it will highlight purple.

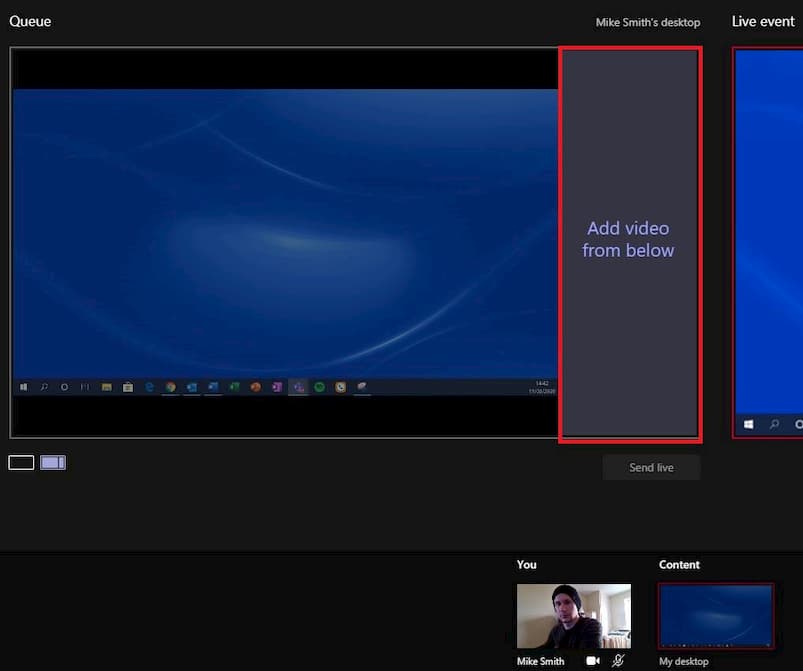
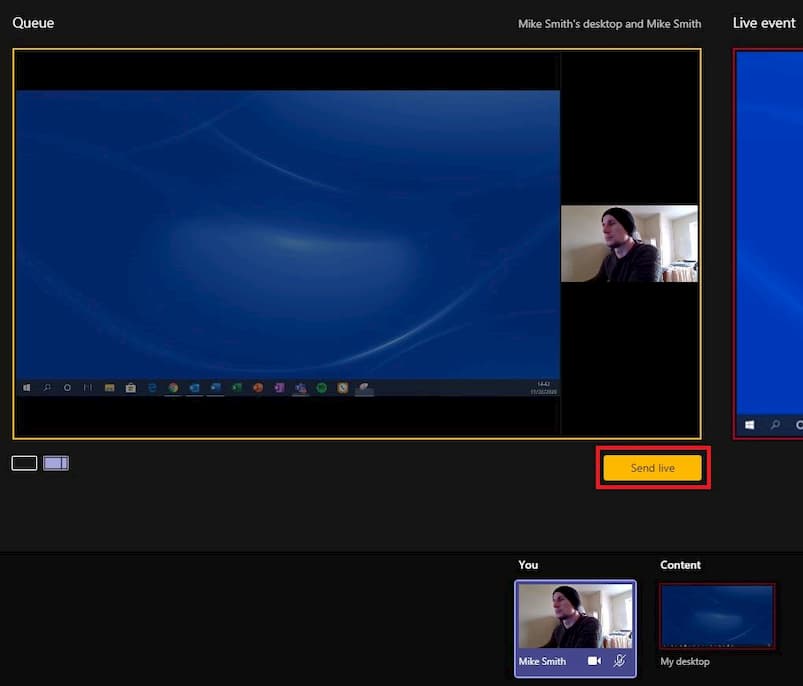
You can now select a video feed from yourself or one of your presenters and it will display next to the content in the queue.

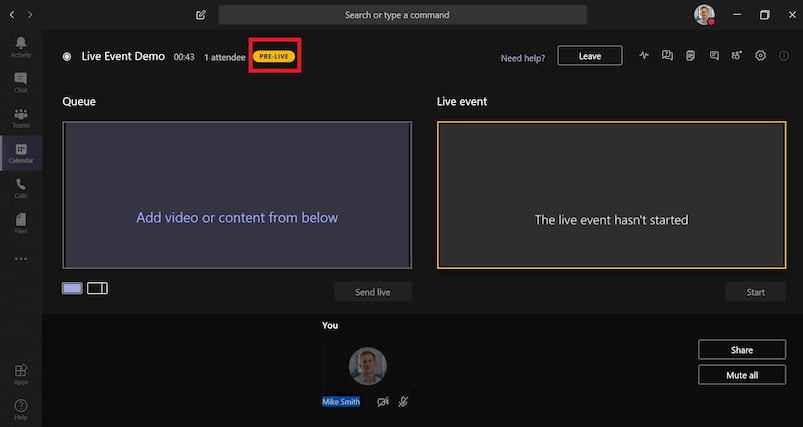
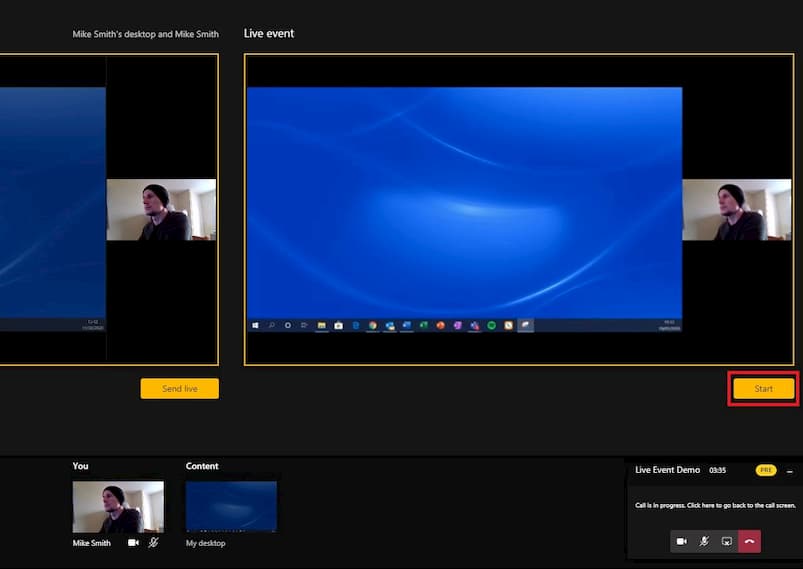
Next, you’ll want to click the ‘Send live’ button which will add the content to the ‘Live event’ window too.

The event is not yet live, so next you’ll need to click the yellow ‘Start’ button.

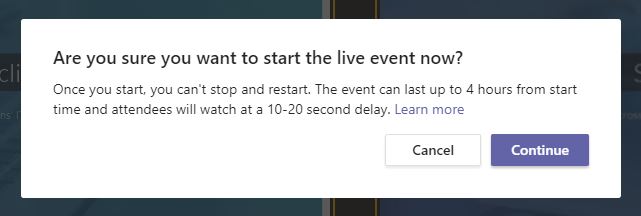
This will bring up the following prompt. Click ‘Continue‘ and the event will be live for attendees.

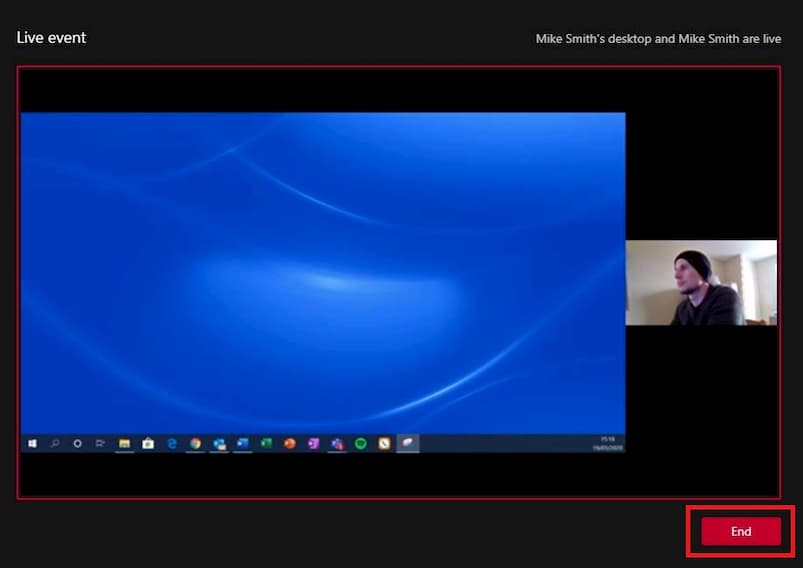
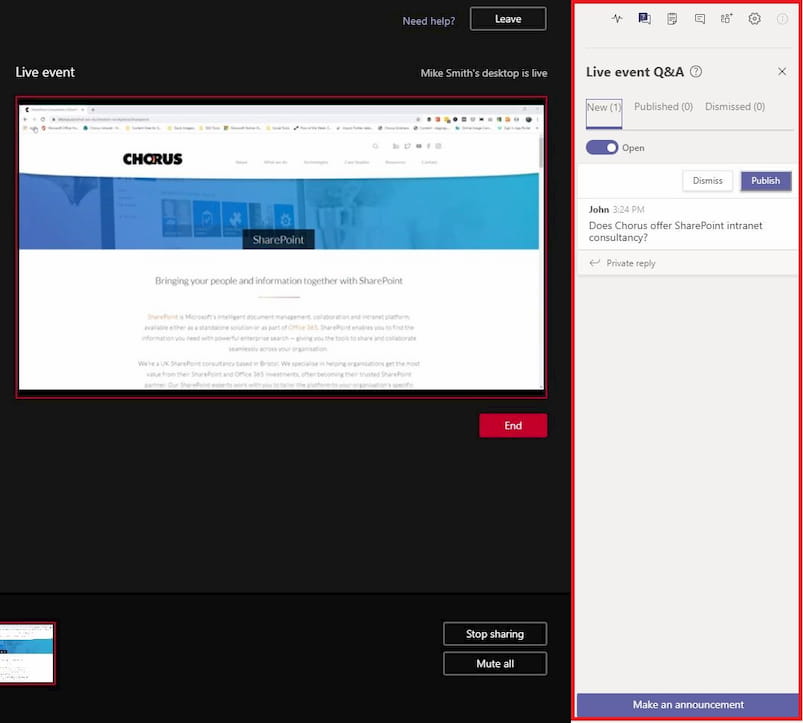
You’ll know that you are live as you will see a red ‘Live’ button towards the top left corner of the screen — along with a red dot (recording), the event name, how long the event has been running and the numbers of attendees viewing the event.

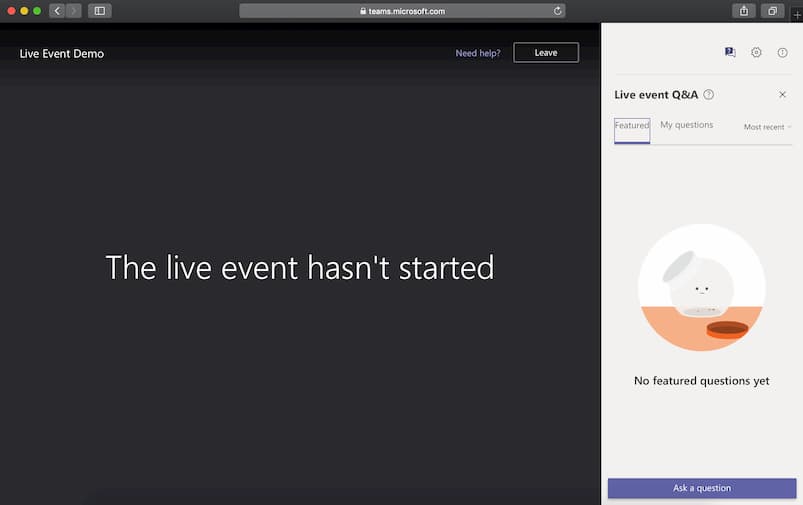
Now that the event is live, your attendees will see the content live on their screen — likely following a delay.

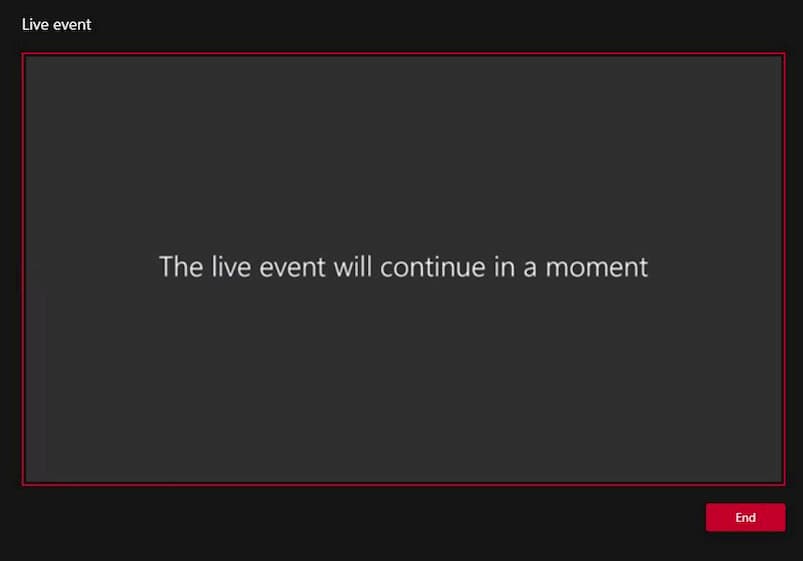
There will also be a red ‘End’ button under the live event window – which you can use to end the event once you’re finished.

How to switch between content in Teams Live Events

Switching between content isn’t quite as simple as you might expect it to be. It’s very important that you run test events before your main event to ensure that you’re comfortable with the functionality and how to switch between your content and presenter’s content.

If you’re sharing some content live, you can’t add multiple pieces of content to the queue at once — which would be ideal.

For example, if you were sharing a PowerPoint deck and wanted to switch to sharing an application like Dynamics 365, you would ideally want to queue up the Dynamics 365 window in the queue and then send it live once you were finished with the PowerPoint deck.

However, you can’t do this. What you can do is click ‘stop sharing’. This will stop sharing your content and the attendees will see this screen while you find your next piece of content to share.

N.B. if you were displaying your video next to your content using the ‘content left’ view, your video will then be shared full screen with attendees while you find the next piece of content to share.

You can then click ‘share’ again and pick the next piece of content which will be pushed straight into live – so be aware of this.

If you are sharing content, you can queue your live video and then click ‘Send live‘ (whilst you are selecting your next piece of content to share). This creates a more seamless transition, without showing attendees the ‘live event will continue in a moment’ screen.

It’s also worth noting that when content is being shared during the live event, if a Producer or a Presenter clicks ‘share’ and selects some different content, this will push straight into the live and attendees will see the content. Therefore, you’ll want to do a rehearsal of your event beforehand and make sure each member of the teams knows the timings for actions such as sharing and when their video is going to be live.

Q&A in Microsoft Teams Live Events

If you enabled a Q&A when creating your live event, the attendees will have the option to ask questions in the right-hand Q&A window. They can either post anonymously or add a name above their question.

When an attendee asks a question, you’ll see a small notification above the ‘Q&A’ icon in the menu bar in the top right of your screen.

If you click on the icon, it will open your Live event Q&A window on the right of your screen. You’ll see the new question(s) under the ‘New’ tab. You can either send a private reply, or you can click ‘publish’ which will make the question visible to all of the event attendees. If you choose to click ‘dismiss’, the question will be parked into the ‘dismissed’ tab.

The questions you choose to publish will appear as ‘Featured’ questions to attendees. As you can see in the screenshot below, attendees can see featured questions as well as questions they have asked under the ‘My questions’ tab.

You can also use the button ‘Make an announcement’ to publish message to all attendees. This is useful if you want to say something along the lines of “Hi everyone, the event will be starting in around 5 minutes”.

What to do after the Teams live event has finished

After the live event has finished, go back to your calendar in Teams and open up the live event calendar item.

Once the pop-up window opens with the event details, scroll down and you’ll see ‘Live event resources’.

Here you can download:

  • Recording: a video file of the live event
  • Q&A report: a .csv file with record of questions asked, responses and identities
  • Attendee engagement report: a .csv file with names of attendees – where provided – and actions taken/roles

An example of the Q&A report is below where you can see a question asked by an attendee and the moderator’s response.

The final thing to do is to follow up with your attendees with any resources you want to share as a take-away and your call-to-action.

Next Steps

To find out more about using Microsoft Teams, take a look at our Microsoft Teams Services. If you would like to find out more about Microsoft 365 and how Chorus can help you get the most out of your Microsoft licensing, get in touch today.