Insights

Calculating working days in Power Automate or Logic Apps

First published on www.jrjlee.com

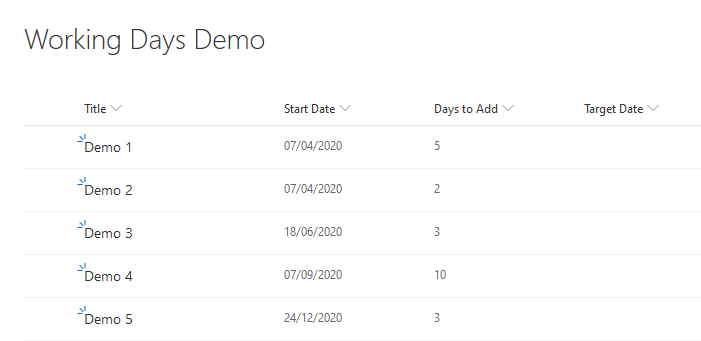
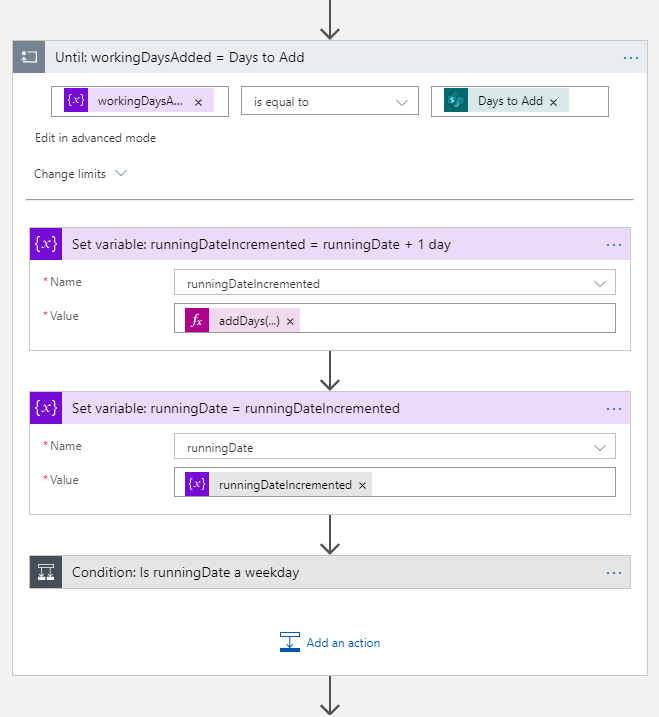
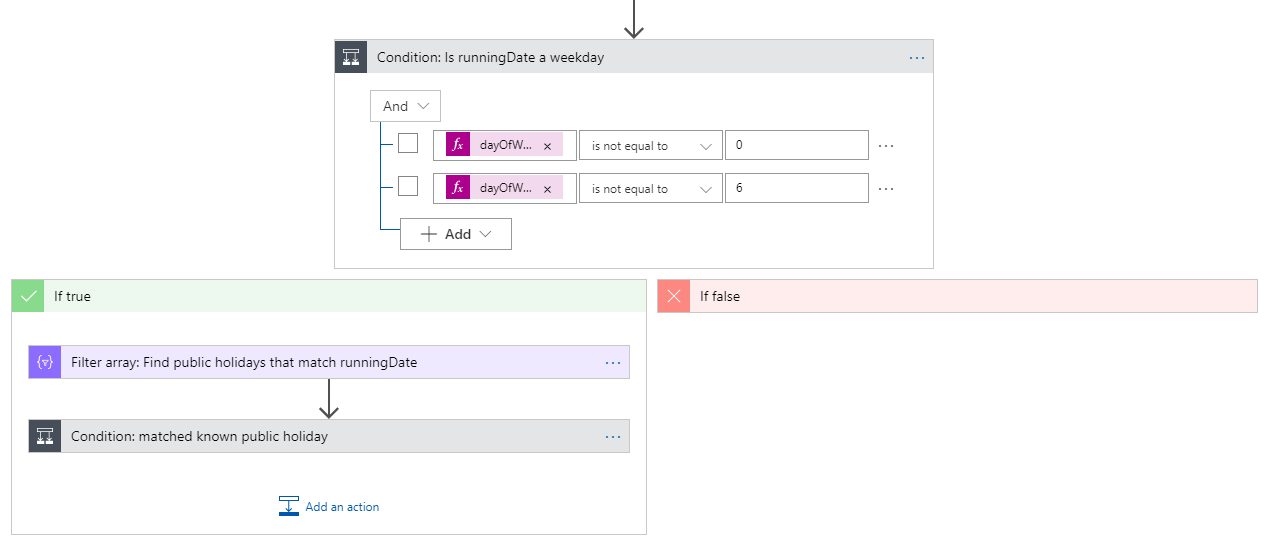
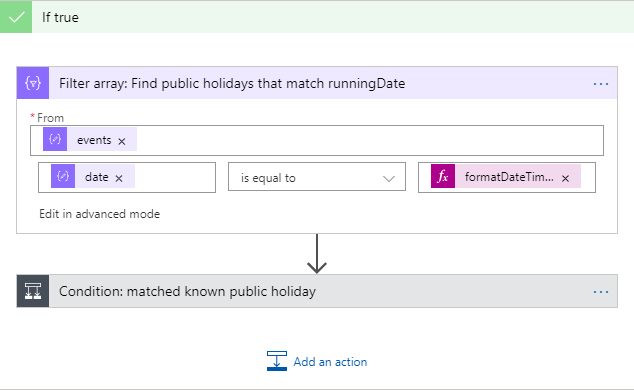
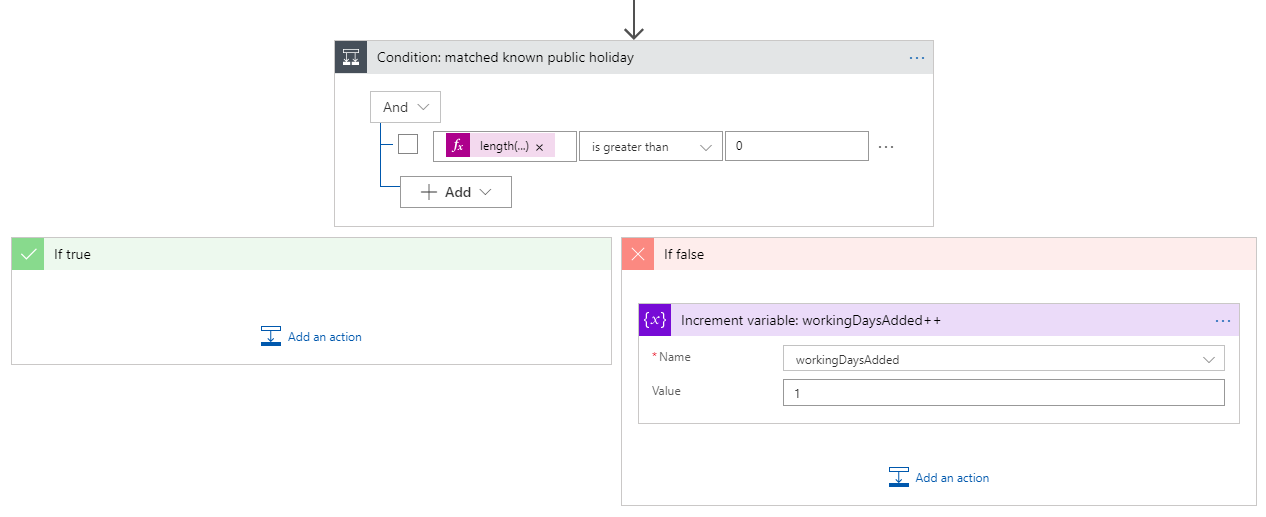
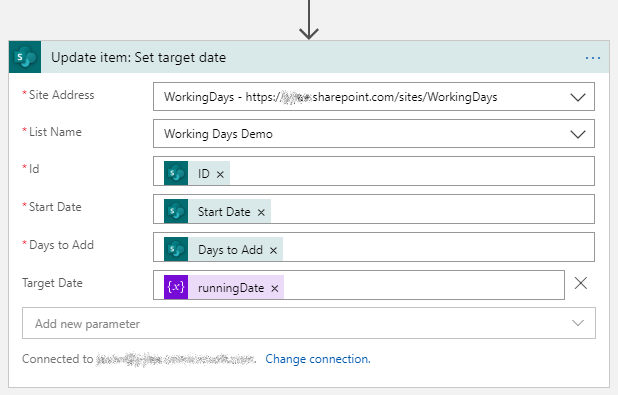
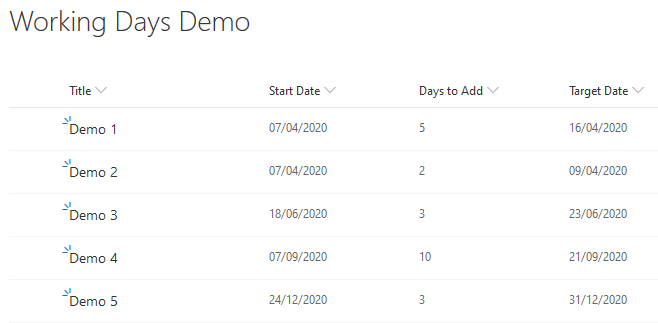
Here’s a common scenario for any kind of SLA-driven process – calculate a target date or a due date for a task based on a number of working days. In most cases, we can take working days to be everything except weekends and public holidays. Let’s take a look at how you might go about it in Power Automate or Azure Logic Apps.

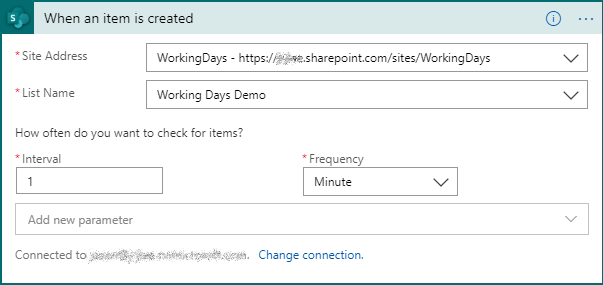
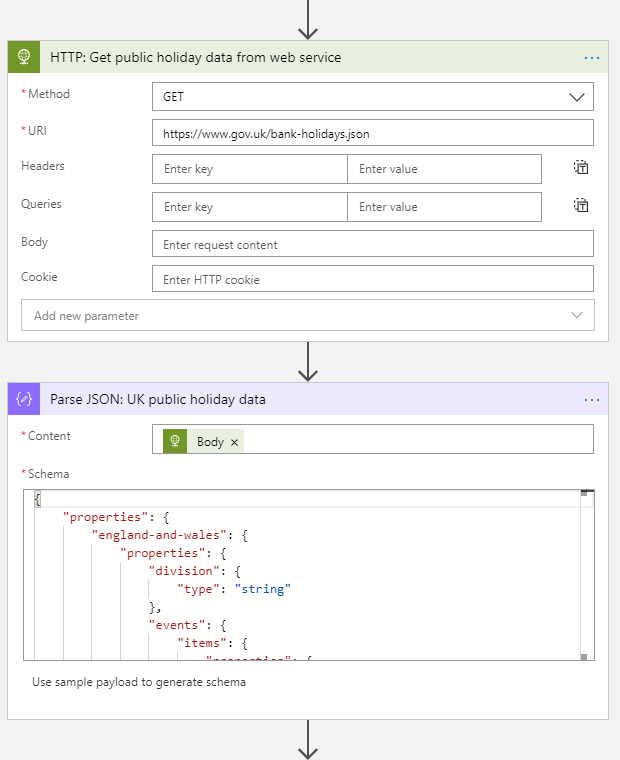
Note: the approach is identical regardless of whether you go with Power Automate or Logic Apps – I’m using Logic Apps in this case because the HTTP connector requires a premium license in Power Automate.

The challenge

Given a start date and the number of working days we need to add, calculate a target date.

High-level approach

The algorithm works like this:

  1. Add one day at a time to our start date – let’s call this the running date.
  2. If the running date is not a weekend or a public holiday, increment a counter.
  3. Repeat until the counter equals the number of working days we need to add.
  4. Set the target date to the final value of the running date.

The trigger

To keep this as simple as possible, let’s start with a SharePoint list with three key fields – Start Date, Days to Add, and Target Date. We’ll manually set the Start Date and the Days to Add, and we’ll use the logic app to calculate the Target Date:

Note that those are UK date formats 😊

We’ll trigger the Logic App every time an item is added to this list.

The variables

We need to define a few variables at the top:

  • workingDaysAdded is our counter – we’ll use this to keep track of how many qualifying days we’ve notched up in our loop.
  • runningDate is the date we’re going to add days to in our loop. We’re initially setting this to the start date we got from the SharePoint list item.
  • runningDateIncremented is a variable we’ll use to store temporary values when we’re calculating dates.

Note that we’re using strings for the date variables – Logic Apps and Power Automate connectors typically pass dates around as date strings in UTC format.

The public holiday data

You can get accurate public holiday data from various sources. In this case, I’m using an HTTP activity to send a GET request to https://www.gov.uk/bank-holidays.json, to get official public holiday data for the UK. This returns data that looks like this:


{
"england-and-wales": {
"division": "england-and-wales",
"events": [
{
"title": "New Year’s Day",
"date": "2015-01-01",
"notes": "",
"bunting": true
},
{
"title": "Good Friday",
"date": "2015-04-03",
"notes": "",
"bunting": false
},
{
"title": "Easter Monday",
"date": "2015-04-06",
"notes": "",
"bunting": true
},
...
]
},
"scotland": {...},
"northern-ireland": {...}
}

I’m then using a Parse JSON activity to convert that response into an object, to make it easier to work with later on:

Tip: That Use sample payload to generate schema option is very useful – just paste in a typical response from your web service and Logic Apps / Power Automate will do the work for you.

The loop

To do the calculation, we need a loop. In Logic Apps, I’m using the Until activity. In Power Automate it’s called Do Until, but it’s the same thing. We want to run the loop until the value of our counter, workingDaysAdded, is equal to the number of working days we need to add (provided by the SharePoint list item). At a high level, the activity looks like this:

For clarity, in advanced mode, the loop condition reads @equals(variables(‘workingDaysAdded’), triggerBody()?[‘DaystoAdd’]).

The next thing we need to do is add one day to our running date. Logic Apps and Power Automate won’t let us write expressions like runningDate = addDays(runningDate,1), so we need to do this with two Set variable activities:

  1. Set runningDateIncremented to addDays(runningDate,1).
  2. Set runningDate to runningDateIncremented.

The end result – we’ve added one day to runningDate.

The weekday check

Checking whether a specific date is a weekday is straightforward in Logic Apps and Power Automate. We use the dayOfWeek function. This returns a number – 0 is Sunday, 6 is Saturday, and anything in between is a weekday.

If the condition is false, we do nothing and let the loop go back to the start. If the condition is true, we need to check whether our weekday is a public holiday.

The public holiday check

To check whether our weekday is a public holiday, we need to see whether it matches any of the records in our public holiday data. We can do this with a Filter array activity:

The From input is an array from our Parse JSON activity – specifically, this is:

body(‘Parse_JSON:_UK_public_holiday_data’)?[‘england-and-wales’]?[‘events’])

For the filter criteria, we’re returning only items where the date property matches the running date. We have to format the running date to match the format of the bank holiday data – in advanced mode, the filter array expression is:

@equals(item()?[‘date’], formatDateTime(variables(‘runningDate’), ‘yyyy-MM-dd’))

If our filtered array contains more than zero items (use the length operator to check), we know our running date is a public holiday:

If this is true, we do nothing and let the loop go back to the start. If it’s false, we know that our running day is (1) not a weekend, and (2) not a public holiday. In this case, we increment our counter (workingDaysAdded) before the loop goes back to the start.

The result

When the workingDaysAdded counter reaches the target Days to Add value we pulled from the SharePoint list item, our loop will stop running. At this point, our running date is the date we need – it’s the start date with the required number of working days added. We can use an Update item activity to write this value back to the SharePoint list item:

If you check the SharePoint list against a public holiday calendar for England and Wales, you’ll see that everything adds up nicely!